Responsive Web Design

by Dan DeMeyere - @dandemeyere

I've been waiting to write a post on responsive web design (RWD) for a long time. I think it's a really powerful tool for websites that care about usability and UX. Definitions for RWD vary depending on the source because it's a relatively new 'technology', but I would describe it as developing a website in such a way that the layout/look responds accordingly as the browser changes by dimension or by device.

There's an important distinction to make about my definition. Just because a website looks different on a mobile device than it does on your computer, doesn't necessarily make that website responsive. A lot of websites detect whether you are viewing the website on a computer, phone, or tablet and either serve up a separate CSS file specifically built for that device type or they might even serve up a completely separate mobile version of their website or application.

For example, if you use 37signals' Basecamp product and you login on your computer versus logging in on your phone, you will be using their product on two completely different development frameworks. I don't doubt that they use some responsive elements in their design, but RWD is when it's the same exact website that uses a combination of specific RWD techniques, such as media queries, to alter your client-side interaction while the server-side code remains the same.

It should also be noted that RWD isn't for all websites. If you have a very large website (i.e. 50+ pages), it's going to be very hard to make all those pages responsive with any continuity without sinking an excessive amount of time into it, especially if your layouts differ from page to page. It also adds overhead in the sense that any design change require another level of upkeep and quality assurance.

If this still isn't making sense, I listed a couple example below that illustrate what RWD looks like in action.

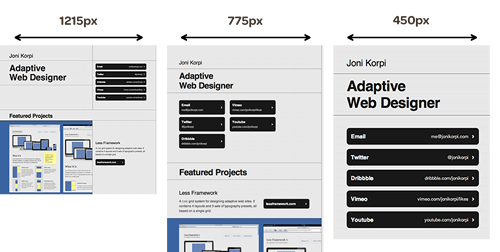
The most simple use case for this is adding it to your personal website. A really good example of RWD in action is Joni Korpi's personal website. I meant to write about Joni Korpi in my web designer portfolio post, but his three-tier responsiveness was too perfect for this one.

If you look at the picture below, you'll notice there are 3 different layouts to his website. Each layout corresponds to a certain browser dimension. If you go to his website (it's been re-designed since I captured the images) and re-size your browser to those dimensions, you'll notice the website's layout/design changes on the fly - it's pretty cool.

Next up is the French Earth Hour conference website. On a quick tangent - I think the colors of this website are awesome. Anyways, I only noticed two different responsive designs for this website as you see below. For some websites, that's all you really need. The creators of this website probably only wanted to optimize the design for full-width and standard mobile dimensions; I'm guessing this is the case because people typically hear about a conference through email, social media (both viewed in full width browser) or through oral referrals away from the computer (mobile browser). Something especially cool about what they did for their second layout (the one on the right) is that they removed some elements of the page to ensure the most important content was still above the fold - sweet trick.

Last, but not least, is Trent Walton's blog. Websites that contain content that can be consumed on multiple mediums is the most natural need for RWD in my opinion. I spent a good amount of time inspecting the source/CSS of Trent's blog as it was very helpful for building my new website's layout in a flexible and fluid way that is optimized for RWD.

As I just mentioned, I'm currently re-building my personal website, hence the lack of posts, but one of the first things I'm going to do once it's finalized is start working on making it responsive - which I'll attempt to document the best I can for another post. If you're looking to make your website responsive, I would check out the following posts:

Running tests under spork with apps using Thinking Sphinx

My recent post on thredUP now using spork to speed up our test suite was missing a key part.  This week Liah, one of our developers, noticed that the models weren't getting reloaded properly when the code was changed.  This was the underlying value that spork promised (not having to restart the app for every test run) so something had to be amiss.  Sure enough, after a little digging, I found out that thinking sphinx has this annoying preference to preload rails models.  This causes the models to be loaded once, during spork boot up rather than on each run.  Yikes.

The fix for this uses Spork's handy "trap_method".  They even have a wiki page dedicated to it: https://github.com/timcharper/spork/wiki/Spork.trap_method-Jujutsu. They don't mention thinking sphinx on there but after a little digging, I found out that the code I need to add to my prefork methods was something like:

The problem I soon realized was then when you tried to run our tests without spork it would error due to this trap_method.  The fix for this was to use a check to see if spork was being used:

In the end these were fairly easy fixes but the documentation for the specific sphinx method was a little thin out there so I thought I'd throw this together and hopefully someone else will find it helpful.

Get more test-driven by making it faster and easier to run your test suite.

One of the goals I have for the thredUP dev team is to become more and more test-driven.  From bugs to clear feature planning I think basically everyone is on board with this need but we have a big problem.  Our app takes forever to start (~20s) and the suite is bloated.  Well, I found a temporary fix for the startup problem on Friday and implemented it today!

Using a combination of spork and guard, our developers can now start up the "test running server" with "guard start".  And then run any specs or cuke features as usual!

The setup was very easy and the best resource for this was Christian Bradley's post on the Carbon Five blog.

We'll see over the next sprint if this makes things a little more developer friendly and results in better test coverage and cleaner test suites throughout the sprint.

While this is a huge win for small sets of tests it really doesn't impact the full suite runs and also doesn't fix the underlying bloat of the app startup.  So there's more work to do.  Potential topics coming up on the testsuite hitlist for future posts:

- Continuous Integration Server - Goldberg
- Slimming down seed data to speed up tests
- Using test performance as a benchmark to improve app performance
- Using parallel_test to run the full suite in a distributed way

Overriding the Default Retrieval Limit in FbGraph

by Dan DeMeyere - @dandemeyere

One of the many thredUP projects I'm fond of is the Daily Thred. Every weekday, two of the Moms here at thredUP post a new article that is discussed in the chat tray on the right side of the page. This chat tray was built from scratch utilizing the Facebook Graph API and FQL with JavaScript.

One of the many challenges that surfaced was collecting metrics on activity occurring in the chat tray, since all the activity was stored in the Facebook databases. I didn't want to pull these metrics with JavaScript and since our server language of choice is Ruby, I turned to FbGraph, which is a full-stack Ruby Facebook Graph API wrapper.

It's a cinch to install and the usage is intuitive - I couldn't have been happier with the gem. After I finished implementing the metrics for the chat tray, I deployed to production and quickly found a problem. The way our chat tray works is as follows: every article is tied to a Facebook Post object. All comments made in the chat tray are Facebook Comment objects where the parent_id is the Post's id. Simple enough. So to fetch all the comments for a post to analyze the results for the metrics, I did the following with FbGraph:

The problem was the number of comments returned maxed out at 50. Since some of our chat tray conversations have over 300 comments, it was crucial I had access to every comment. I tried some standard ActiveRecord conventions like post.comments.limit(1000) to no avail. After a round of Google searches and sifting through some Github issues, I came across someone who had a similar concern. Their solution involved paging through the comments. This wasn't sufficient for me so I went poking around in the gem.

After a quick cd `bundle show fb_graph` command, I started to peruse around the gem's lib files. Inside the Post class, I noticed the associated @_comments_ object was created through the Collection class. Once inside the Collection class (/lib/fb_graph/collection.rb), I noticed there were four variables that def fetch_params checked for - one of which was 'limit'. So after adjusting my script like below, all was good.

From the Dev Couch: All Ruby Baby

by Dan DeMeyere - @dandemeyere

Rubyflow is a great Ruby blog aggregator. I subscribe to their RSS feed and every day there are multiple posts that either pique my interest or are relevant to gems or technology that I work with. I don't have time to read all of them everyday so I bookmark all the good ones and set aside a couple of hours every week to parse through them all. Featured in this post are the articles that I learned something from or determined are worth saving for a later date as it could become handy in the right situation.

Realtime Data Overlays Using Google Maps

The Ghostly Map
A couple of months ago the thredUP dev team wandered over to Cloudflare's office in SOMA to celebrate their recent achievements. While we were enjoying a couple of beers, we stumbled across a 10-foot projector screen displaying a realtime geo-mashup of their service in action. My colleagues and I all looked at each other and knew instantly we had to do something similar. While our version is still on our 'fun to-do list', this post on Stac's blog is a good walkthrough about how to make a realtime maps mashup with Rails 3. They cover using Rails' cache store API, use of Backbone.js, Underscore templates, GeoKit, and the Google Maps API. Read more →

Automatic Page Loading

Endless Page Scrolling with Rails 3 and jQuery
This has to be the coolest post I came across. Do you ever wonder how Facebook only displays a certain number of comments or status updates and when you approach the bottom of the container, they automatically add more? Well, this is how you can do it. It's a relatively simple implementation using jQuery to attach a custom handler on an element that makes an AJAX call to your Rails controller to append more data to the element. The only required file is his custom jQuery library, which can be found on GitHub here.

Altering Rails' Naming Conventions

Pluralizations and Singularizations (Inflections) in Rails 3
When I first started learning Rails, I found the naming conventions difficult in routes, controllers, and models. What was plural, what was singular, and what stayed the same - i.e. if the model is history.rb, is the controller histories.rb? In general, Rails is pretty good about getting that kind of stuff right, but if you want to override how they pluralize or singularize anything, then this post will be great for you.

Optimizing MySQL

Tuning MySQL - Innodb, Buffer Pool Sizes, and Rails Stack Server Advice
I'm not going to even pretend I know 10% of what's going on in this post. Even though it's way over my head, I have to imagine every person who works on a MySQL-based app can read this post and have some valuable take-aways. Did you know you can log slow queries by changing performance values in your MySQL my.cnf file? You can even change how many seconds constitutes a long query for your app. On top of that, you can log queries that aren't using indexes. Now that's pretty slick. There is also good advice for those using a Rails/Apache/Passenger/MySQL/Memcache stack (which is what we use at thredUP). Read more →

Notable mentions

Working for a Start-up: Developing Outside Your Demo

by Dan DeMeyere - @dandemeyere

When you work at a start-up, you're not given a bulleted feature spec. document detailing every design detail, each UI interaction a user will experience, or how every page of a feature is supposed to flow. Although it can vary, you're usually given three things: what the feature is, why we are building it, and basic expectations of the deliverables. Some people find this overwhelming. I, however, wouldn't want it any other way.

The freedom of taking a feature concept and turning it into a functional aspect of your web app used by thousands of people every day creates a certain level of responsibility that is intoxicating.

Every decision is important. Deciding how your feature will hook into the current app on the back-end, how users will navigate to your feature, etc. are all decisions you need to work through on your own and they typically require a decent amount of thought. The easiest way to go about this is putting yourself in the shoes of your user and asking yourself, 'if it were me, how would I expect this feature to behave?' But what if you can't put yourself in the shoes of your user?

thredUP.com's demographic is comprised of over 99% women. 100% of thredUP members are parents. One could make a very strong argument that it's not possible for me to be further from our demographic, yet I develop for thredUP every day and build features that our members enjoy (I hope). So what are some of the tips I use?

Align Your Perceptions

If you're not a power user of your service, find one and talk to them. My CEO is a parent of a 9 month old girl and he uses thredUP for almost every piece of clothing she wears. Because of this, I can pick the brains of one of our super users without leaving the office. I might think a feature is great, but then again I don't have children and I'm not using the service out of necessity so my perceptions aren't really aligned with reality.

Another great way to ground your assumptions is to do customer service. Talk with your users. See what problems they are having and what isn't obvious to them. Something you think is intuitive might be confusing to your user. I live in a world of Macbook Pros, iPads, Androids, and know what AJAX is and how it should behave. However, over 47% of our members use Internet Explorer and some of our users are notorious for 'double-clicking the internet'. This is why we've started disabling buttons once you have clicked them and display activity spinners every time an AJAX call is made to let our users know the service is processing something. Intuitiveness is relative. The dichotomy between Windows users and Mac users is sizable enough where you can't assume that a behavior you find second nature on your iPad won't be obscure to half your users.

Use Your Service

This might sound ridiculous, but you have to use your service as your members do. If I worked at Quora or Twitter, two services I use and enjoy, this wouldn't be an issue; however, some of us work and develop for services that are not intended for us. This shouldn't stop you from experiencing your service the way your members do. For example, I pick and list boxes at thredUP and I even have a public profile on our website. The last time I listed a box, I found myself noticing how 4 steps should really be 3 and that an email I received wasn't as helpful or descriptive as it could be. These are the things that help you avoid developing blindly and building features no one will use.

Of all my tips, I fall victim to this one the most and it's probably the most important of them all. My bosses emphasize doing this on a regular basis and I'm grateful as it's important to discover the pain points of your service first hand.

Metrics, Metrics, Metrics

Figures don't lie, but liars figure ~ Mark Twain

Have you ever gotten into an argument where someone states something like 'all of our users ' or 'no one uses ' and you know they are wrong but you can't prove it? This is why you need to become friends with metrics. If you can't pull them yourself, find a developer who can and ask them for a specific data-set. Sometimes the easiest way to do this is to tell them exactly what you're hoping to derive from the statistics. Translation can be lost between models/databases and the names of features thrown around the office. A good developer should be able to find conclusive data for the metric you're looking for.

Solid metrics with proper baselines can save you from arriving at the wrong conclusions. I wish I did this more, but benchmarking all your features after enough time has passed to collect a valid sample set of data is foolish not to do. I sometimes say to myself 'if only I had more time', but that's just a lazy statement. You could run one query that takes you a minute to write that could save you days of development. One great example of this is when we launched a new homepage design that we all thought was amazing, but the metrics disagreed. The homepage had notably worse conversion rates and it became apparent that we had to move on and figure out why our development assumptions were off. I actually wrote about the dilemna we faced and the art of swallowing your pride and admitting when you're wrong. Which leads me to my last point.

Know When You're Wrong

If you're not in your demographic.
If you're not a super user of your website.
If you don't have metrics to back up your assumptions.
Then you have to face the music.

The fastest way to lose an argument, lose your leverage in arguments, and lose respect is by making unfounded statements. Bite your tongue unless you know what you're talking about. Before you go into a meeting and discuss the conception or evolution of a feature, think out your reasoning and be ready to back it up with something undisputable (metrics) or personal experience with the matter (user stories). Maybe your still wrong, but you won't lose respect if you're prepared and you're offering conclusions on valid assumptions.

Getting Started with CoffeeScript (Part 1 of 2)

by Dan DeMeyere - @dandemeyere

If you're a Rails developer, CoffeeScript is something you need to pay attention to. With the news that CoffeeScript will be included by default in Rails 3.1, CoffeeScript is definitely generating a sizable amount of momentum and the core Rails team believes it's the future. Knowing this, I was looking for an opportunity to use it and a clean project presented itself this sprint at thredUP. So with the help of my colleagues Kylie and Chris, we dove in and started playing away.

The first step is installing CoffeeScript. I used CoffeeScript's official installation instructions, but I ran into some weird export PATH environment issues so I installed it with Homebrew instead.

To install Homebrew, just run this command in your terminal (assuming you have xCode installed already):

Next, you need to install Node.js, which will compile your CoffeeScript for you. With Homebrew installed, all it takes is one line:

You're almost there. Just two more install commands left. The first is installing Node Package Manager and the second is using NPM to install CoffeeScript.

Done! Pretty harmless, heh? Time to start writing some CoffeeScript! Since people abbreviate JavaScript as JS and I'm a sucker for typing less, I'll just refer to CoffeeScript as CS throughout the rest of this post. It doesn't matter where you place your CS files, but I believe Chris told me the best convention is in your app/assets folder. So if you haven't done that, go into your terminal and make the directory:

You can end your CS files with .coffee or .js.coffee, so create a new file in there so we can finally write some code. The project I'll be using as my example is heavily focused with DOM manipulation and since thredUP's library of choice for that is jQuery, you'll be seeing a lot of that in here.

When I first got everything setup, I was a little bit paralyzed. I didn't know where to even start. So the first thing I did was I wrote what I wanted in code in plain JS:

It's basically a setup function that calls another function which iterates over an array and logs the contents. What does this look like in CS? Like this:

Pretty sexy, right? CoffeeScript is very clean (based on Ruby and Python syntax) and it makes it much easier to work with, to read, and it's easier on the eyes. Before I get ahead of myself, there's a couple of things in this code that need to be explained, but first let's give you some resources. Syntax reference for CS can be found here. Once you're on that website, click 'Try CoffeeScript' and an interactive window appears which allows you to type CS directly into a console that the website compiles the corresponding JS right in front of you. This is what it looks like when I typed in the code above on their console:

The first thing you're going to notice is the JS code that I original wrote and attempted to create is different from what was outputted on their console. The reason is because CoffeeScript's compiler is a better JavaScript programmer than me :) I can assure you that my original block of JS code and the compiled CoffeeScript JS code execute the same, but the CS version is going to do it a lot smarter and probably more efficient. CS is going to compile into the best JS it can without changing how your JS functions.

Another note worth mentioning is that the marketDemand object is oriented off of the JavaScript 'window' object. I didn't know this, but apparently this is something I should have always been doing as it prevents objects, variables, and functions that you write from spaghetti scoping out of control. I think it's one of those "trust me, it's better practice this way and you don't want to discover first-hand why it's necessary, but it is" things.

So let's paste that code into the .coffee file you created. The next step is to compile it on your terminal:

If you paste that into your terminal, it will compile all CS files in your app/assets/coffeescripts folder (-c stands for compile) and output them into your public/javascripts/coffeescripts/ folder (-o stands for output). Now, if you're always looking for short-cuts like I am, you'll like this next one:

That command will watch a specific CS file and when it detects a change, it will automatically re-compile it for you. Pretty killer, right?

This post became a lot longer than I originally intended so I broke it into two posts and I'll post the second one in a couple of days. In the next post I'll be going through using jQuery in CoffeeScript and covering if/else statements and other standard snippets of JS -> CS that you might find handy.

Minimum Product Strategies

by Dan DeMeyere - @dandemeyere

When you're creating a new feature or adding functionality to your web app, you typically don't have time to dive into the minutia of every aspect of how the feature will look, behave, and function. Obviously you can indulge yourself into that level of detail, but it is typically the most time consuming aspect of a feature and it shouldn't be tackled until the minimum required functionality of the feature is complete.

If you get caught up in the sexy or fun part of the project, the user-facing portion, it's possible you'll use all of your allotted time for the project carrying out non-critical feature development and you won't be able to release anything as your feature still isn't functional. If you develop in such a way that you make the feature usable and functional first, you can spend all the remaining time layering on the subtleties of good UX. If things go wrong and you end up having very little time to layer on the aesthetics, at least you can release the feature and come back to the subtleties later. This strategy for building features is commonly known as Minimum Viable Product (MVP).

I am a very big proponent of developing with a MVP mindset. If I'm given a 3-day window to work on a project, I'll determine what the MVP and critical path for that project is within the confines of 3 days. With this mindset, my only enemy is scope creep. Scope creep is inevitable with every project and unless it's absolutely necessary, my natural reaction is typically 'great idea, but it should probably go in version 2 of this project'. This approach is a double-edged sword. Because I take this stance, very rarely are my projects not completed by the designated time; however, it's possible that the MVPs I develop are too bare-boned to be a feature that users will be delighted by. This is where we enter a gray area.

I can go the extra mile and try to delight the users, but then I will run the risk of spending too much time determining what I think the users will perceive as delightful, which is highly subjective and not always obvious. It leaves a certain level of uncertainty in determining the completion of the project that I'm not comfortable with.

The concept of building towards a delightful product, or Minimum Delightful Product (MDP), was coined by either James Reinhart or Oliver Lubin, I can't remember which. Respectively, they are the CEO and CCO of the company I work for - thredUP.com. MDP is a very forward-thinking strategy to product development, but I'm going to go against the grain and disagree with my bosses and their concept. Before I do so, I want to elaborate on the idea of MDP.

I believe MDP is the evolution of another strategy that bares the same acronym, Minimum Desirable Product. Minimum Desirable Product is the simplest experience necessary to prove out a high-value, satisfying product experience for users. That definition is a direct quote from Andrew Chen's aptly named blog post 'Minimum Desirable Product'. In this post Andrew Chen (@andrewchen) explains that MVP tends to center around the business perspective of a feature and what you really need to focus on is what feature your users desire.

What my co-founders argue in favor of building for delight over desire is that sometimes what users want (desire) is different from what will actually 'wow' them (delight). If users were able to add every feature they desired, you potentially could end up with a cluttered product. While there are many examples of this, my favorite is the homer-mobile. Homer Simpson once created his dream car with every bell and whistle he could possible want, but it ended up looking like this:

I could also demonstrate the other end of the spectrum by showing a product that succeeded in ignoring feature requests and still delighting their users - the Apple iPad. Users wanted Mac OSX on the iPad and countless other features, but Apple determined the core experience they wanted the iPad to emanate and built towards that while letting many features fall by the wayside. I think we can all agree that the iPad has been a smashing success and the simple experience and usability is a fundamental reason why. I'm not saying that building for what users desire leads to building cluttered apps, but there's definitely a gap between what users desire and what will delight them. Because of this I believe there is great merit to the Minimum Delightful Product way of thinking. So why am I hesitant to buy into it then?

The reason why I am hesitant is that 'delightful' is a very subjective term and assuming you know what the users will consider delightful is a bold statement. Outside of Apple and a few other companies, most struggle with always delivering a delightful experience and if you're not in your product's demographic (like myself), it becomes even harder to identify what will be delightful for users before the product is built. I'm not saying building a Minimum Delightful Product is wrong, I'm just saying it's difficult and you're bound to arrive at the wrong subjective assumptions every once in a while.

I don't believe in criticizing without offering a solution, but my spin on the strategy is kind of a cop-out as I believe the right approach is a balance of all three. Obviously the complexity of the project and resources available will always dictate your flexibility on strategy, but in the optimal environment I would prefer to build an MVP that is structurally sound on the back-end and then put a thin layer on top that will elevate the feature to what the users desire while showing glimpses of how version 2 of the feature would delight them. It's basically right in between building desirable and delightful product.

With this approach, you are less likely scrap work made on inaccurate assumptions. The only requisite to my approach is you have to schedule version 2 of the feature very soon after version 1 is complete. If you don't bake V2 into the schedule right after V1, I doubt you'll come back to V1 and ever make it a delightful feature for your users. Build V1 -> collect feedback -> adapt the feature -> release V2. It's eerily similar to the 'MVP -> release -> iterate' agile workflow, but somehow in my head it's different in all the right ways. I think I'll call it the Minimum Dan Product so I can have another MDP acronym to be confused with.

From the Dev Couch: Designers and their Portfolios

by Dan DeMeyere - @dandemeyere

There are back-end developers, front-end developers, and then there are designers. BE devs primarily work with models, databases, and then set-up the controllers so the front-end can get the data they need for their views. With that data, FE devs typically work in the views and use HTML/CSS & their JavaScript framework of choice to make compelling pages. Designers, on the other hand, typically aren't coders and they spend their days in Photoshop/Fireworks taking a wireframe in sketch form to something visually spectacular. If you are one of the few designers who can code as well, we have job openings ;)

There is another type of person in the web community and those are the people who say they are designers when they are not. You can teach someone how to become a programmer, but you really can't teach someone how to become an artist. I admire great designers and because of that I find myself getting upset when I come across pretenders. So for all those who claim to be designers, here are some real designers and here is what your portfolio should look like:

Stephen Caver

Website: Homepage || Portfolio
Dribbble: stephen
Twitter: @deadgraviti

If your a designer, your website should be something special. If it's not, then you better have a pretty good portfolio available. It's difficult to determine if someone is a good developer or not by glancing at their websites or even their source code because there are so many factors that have to be taken into consideration. Were they the sole developer? Is the code theirs or is it a plug-in they're using? Did they even write the code or are they claiming credit for something they just modified? With designers, their work is more transparent. So what's a good example of a designer's website that's special? Take a look:

It's unique. It's expressive. It demonstrates competency in the area of web design and graphical design. Did I mention it's also responsive? My next post will be on responsive design, but if you're new to the term it's when your website responds to different browser dimensions with separate designs. Take Stephen's website and make it smaller. Now make it bigger. Notice how all the elements change? This is so the viewing experience is great on all types of media devices and in all sizes. I love his website.

Chris Spooner

Website: Homepage || Portfolio
Dribbble: chrisspooner
Twitter: @chrisspooner

Chris Spooner is a whole different league of designer. He can code, blog, design and he's an almost unattainable freelancer because of demand for his work. In addition to his freelance web shop, he runs a web design blog called Line25, he has his own personal blog, a graphics blog, and even one for his dog Jake. I'm not saying that if you're a designer you should be like Chris and do all of these because that's unfair. But I guarantee you could learn a couple lessons from looking around on his website and following some of his articles.

His graphics are stunning.

Daniel Burka

Website: Homepage
Dribbble: dburka
Twitter: @dburka

There are exceptions to the rule and Daniel Burka is one of them. He doesn't have a portfolio per sé, but that's because he has held prominent positions in a number products that regularly feature his work. When you're the creative director at Digg or director of design for a game primarily known for it's graphics like Glitch, you have living portfolios and a formal, consolidated portfolio is less necessary. Freelance developers require something to show all their work in one spot, but entrepreneurs and design professionals are able to share their projects (if they are big enough) and let the person inquiring experience their design for themselves. I can only imagine what Daniel and his good pal Kevin Rose are cooking up with their new mobile app in-house incubator Milk.

A good example of these living portfolios is our Chief Creative Officer Oliver Lubin and the graphical/design lead Heidi Howland. Oliver might not have a public portfolio, but he practically designed every UI element on our website thredUP. If you sign-up and use our website, you take a tour of his portfolio. Same goes for Heidi. Every graphic on our website from the clouds in the thredUP sky to the badge icons to subtle background graphics on our How it Works page.

Polishing my Rubies: Instance Variables & the 'self' Object

by Dan DeMeyere - @dandemeyere

If you're not interested in learning about Ruby, this post may not be valuable to you. Proceed at your own dorky will.

Super quick backstory: Ever since joining thredUP back in early September this year, I've been new to Ruby. I spent my first couple of months learning our app and gaining a functional knowledge of Ruby on Rails. 9 months later, it has become time for me to go back and back-fill the fundamentals of Ruby that I missed.

In my opinion, having sound fundamentals in anything, from Ruby to basketball, is what allows you to consistently produce quality results. Luckily for me, thredUP schedules in a healthy amount of time to be designated for professional development. This post is the first in a series of many that will catalogue what I previously did not know or were ambiguous at how they worked behind the scenes.

Please take a look at this example I wrote:

This is mock class that will demonstrate how using self in Ruby works in the context of instance variables. If you read through this class, you'll notice it's pretty straight-forward. Take a minute and write down what you think will be outputted when lines 28-36 run and don't cheat by looking at the bottom of this post.

Don't worry, I'll wait.

Once you're done, compare your results to the code at the bottom of the post. If you were anything like me an hour ago, you would have made some wrong assumptions. So let's figure out why. First, let's define some vocabulary.

  • self - this refers to the current object in Ruby.
  • explicit receivers - the object you are setting to be invoked upon in Ruby.
  • instance variables - commonly denoted with the '@' sign such as @variable. These types of variables are not public (their scope is confined to self), but they are global (broader scope accessibility than standard variables).

That might not seem so tricky, but if you're not careful when using instance variables then you can find yourself accessing or overwriting the wrong variables. So let's dive in head first. On line 28, when we print self out to the screen, the output will show the class name Dolphin. Simple enough - we're in class Dolphin when it's called so there's no surprise there. When we output @display, you'll notice 'no dolphin specified' is printed out. Since that's its original value set on line 2 and no other call has been made yet, this shouldn't be a surprise either.

Next we call Dolphin.bottlenose on line 31 to build our new Dolphin object, which we set to a standard variable named dolphin. Here's where it gets tricky. When we invoke the display method on our dolphin object, we are setting dolphin as the explicit receiver, which will change the object that self is pointing to and therefore the scope of @display changes. You'll notice that the first time we output @display from within the display method, the value is blank or nil. Weird, huh? It's because @display in the context of your dolphin object (i.e. #<Dolphin:0x1001370d0>) is different then in the context of Dolphin. The simple distinction between what the current explicit receiver is set to determines this. If it's still a little confusing, read on as I'll clear it up.

After we finishing outputting within the display method, @display now holds a new string value when the dolphin object is the explicit receiver. Line 34 will demonstrate the difference as it will once again print 'no dolphin specified' since the self object is now referencing the class Dolphin again.

So why is this useful? Well, take a look at what line 36 outputted. You'll noticed that even though @display was not set within the color method, we're still able to access the contents of the instance variable that was set within the display method since the color method was invoked on our individual dolphin object, which changed the context of self again.

Hopefully this was as helpful to you as it was to me for learning how to differentiate how instance variables are set, accessed and scoped. Here is the source code with the output directly following it to make it easier to read what's going on: